How to grow Salad Cress

You Will Need

  • Paper – may be coloured
  • Scissors
  • Crayons and pencils
  • Glue
How to grow salad cress
Salad cress
Salad cress

We are passionate about growing salad cress and want to pass our knowledge and experience on to young growers. Here is our definitive guide for growing salad cress at home.

Follow the simple instructions below and you will soon be enjoying your own salad cress.

  1. Take a container like a yoghurt pot in your hand.
  2. Put a handful of compost into the yoghurt pot and shake to make the compost level (photo 1)
  3. Carefully wet the compost using a watering can or houseplant sprayer. Compost should be moist but not saturated. (photo 2)
  4. Take the packet of seed and open it. (photo 3)
  5. Shake the seed into the yoghurt pot so that the seed is spread evenly on the surface of the compost. (photo 4)
  6. Water the seed in the yoghurt pot until the compost and seeds are wet.
  7. Place in a warm position (at around 20 degrees) and cover the top of the yoghurt pot with a piece of clear or white polythene. (photo 5)
  8. Look at the yogurt pot each day and water if looking dry.
  9. Leave until the seeds are growing. (photo 6).
  10. Move to a place where there is plenty of light – like the windowsill.
  11. Take the cover off.
  12. Check every day for water.
  13. Leave on the windowsill for a few days until the seedlings have grown up. (photo 7).
  14. When ready, cut the cress and wash in cold water – then enjoy!

Teachers' Notes

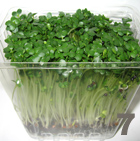
The salad cress seeds we use are actually 70% rape seed and 30% cress seed. Most people find 100% cress seed has a strong flavour. When produced commercially, salad cress must look, as well as taste good. All seedlings must be the same length, have an open leaf and be dark green in colour.

List of equipment

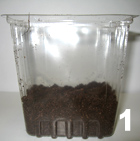
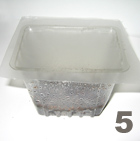
  • Container – 1 per child
  • Moist peat based compost
  • Seeds – either use our mix above or use straight cress seed
  • Watering can or houseplant mist sprayer
  • Cling film or polythene
  1. Cress can be grown in any container from an eggshell to a plastic pot. A yoghurt pot is ideal.
  2. A handful of compost is a guideline – you need 1 – 2cm deep of compost in the container and hands vary in size, as do containers. Work out what you need to successfully put a good amount of compost into the container. Do not worry about the accuracy of the depth of compost.
  3. The compost you use should be a peat-based compost with some fertiliser mixed in. To speed up the water spraying later on you can mix some water into the compost before starting.

Additional information: Salad cress likes quite high amounts of fertiliser. If you want to use some extra fertiliser, get some proprietary brand of liquid feed, either general purpose or tomato feed and put some into the water.

  1. Make sure that the container is given a little shake to level the compost.
  2. Once everyone is happy with the seed sowing, make sure the container is in a place where you can add water. This is the messy stage! The household sprayer gives the best results but is a bit time consuming for small hands.
  1. The first few days do not need much light but do need to be warm (20 to 25 degrees), so on a shelf above a radiator is good. Make sure the container is covered to keep the moisture in. Use cling film or a piece of white or clear polythene.
Additional experiments: You can experiment with the cover and light levels. No light will give tall yellow seedlings, whilst lots of light will give compact green seedlings.
  1. Place the container on the windowsill and leave for another 3 to 5 days until the salad cress seedlings reach the top of the container.
  2. Remember to check every day and to water as necessary.
Additional notes: Three main elements affect the growing cycle – light, water and temperature. Each of these can be varied as part of further experiments.
  1. Your salad cress is now ready to eat. Lift the whole salad cress up and with some scissors carefully cut, so as not to get any peat in with the salad cress. The salad cress can then be washed with clean cold water and is ready to be enjoyed.

Contact us and let us know what resources may be helpful.